.jpg)
In the competitive oral care wholesale market, finding a dependable source for high-quality, innovative products is key. For businesses across the United States seeking the popular LA Sonic Electric Toothbrush, look no further than Powsmart. As a premier Chinese manufacturer and factory, Powsmart supplies top-tier sonic electric toothbrushes directly to distributors, retailers, and wholesalers in various states and cities, ensuring you get market-leading features at exceptional B2B value. This article details our product's advantages, the supply scenario for the US market, and why partnering with us gives you a competitive edge. Powsmart: Your Certified Chinese Factory & Global Supplier Powsmart (www.powsmart.com) operates its own advanced production facilities in China, specializing in professional oral care electronics. We are the direct factory and manufacturer for countless global brands, ensuring strict quality control from design to assembly. For businesses in the United States, this means you are sourcing LA Sonic Electric Toothbrush from an authorized, experienced source, not a middleman. Our "factory-to-you" model eliminates unnecessary markups, providing superior profitability for your wholesale or retail operations. Product Application Advantages & Features (Inspired by Leading Brands) Powsmart's LA Sonic Electric Toothbrush incorporates the best features demanded by today's consumers, making it a standout choice for your inventory:…

Los Angeles Oral Care Wholesale Market: Sourced Smartly from China with Powsmart The oral care market in Los Angeles, California, is thriving. From dental clinics and pharmacies to boutique hotels and corporate wellness programs, the demand for high-quality, affordable oral hygiene products is consistently high. For wholesalers, retailers, and businesses in LA, finding a dependable distributor with a strong supply chain is key. This is where Powsmart stands out as your premier partner. A common challenge in the US market is balancing superior quality with competitive pricing. Many assume that premium products must originate locally or from specific regions, often leading to higher costs. Powsmart disrupts this notion by bridging Los Angeles-based distributors and businesses directly with our partnered, ISO-certified factories and manufacturers in China. This direct supply chain model ensures you receive products that rival leading brands in features and performance, but at wholesale prices that significantly boost your profit margins. It is crucial to clarify: Our products are proudly designed and manufactured in China, supplied by Powsmart's network of specialized factories to meet the specific needs of the Los Angeles and broader California market. We are your supply bridge, ensuring you get factory-direct value without local production costs. Why Los Angeles Chooses Powsmart's China-Sourced…
.jpg)
Your Trusted Commercial Sonic Toothbrush Supplier for Los Angeles: POWSAMRT - Factory Direct from China The demand for advanced oral care products in Los Angeles, California, is booming. From boutique hotels and dental clinics to corporate wellness programs and premium retail stores, businesses are seeking reliable, high-quality commercial sonic toothbrush suppliers. If you're sourcing in LA, look no further than POWSAMRT. Crucially, we are a professional manufacturer and factory based in China, supplying directly to distributors, wholesalers, and brands in Los Angeles and across the United States. This direct-from-factory model is key to the unmatched value and quality we provide to the competitive LA market. Why LA Businesses Source Sonic Toothbrushes from POWSAMRT Factory As a top-tier Chinese factory and supplier, we bridge the gap between advanced manufacturing and your local market needs. Here’s how we cater specifically to Los Angeles commercial buyers: Cost-Effective Wholesale Advantage: Eliminate intermediaries. Sourcing directly from our factory in China means significantly better margins for your business in LA, whether you're stocking shelves or creating private-label brands. Supply Chain Reliability for LA: We understand the scale and pace of the Los Angeles market. Our streamlined logistics ensure consistent, timely bulk shipments to meet the demands of your vibrant retail and…
.jpg)
Powsmart: Your Direct Link to High-Quality Sonic Toothbrushes in Los Angeles For retailers, distributors, and dental professionals across Los Angeles and the wider California market, finding a dependable bulk supplier of innovative oral care products is key to staying competitive. Powsmart stands as your premier Sonic Toothbrush bulk supplier in Los Angeles, bridging the gap between advanced, cost-effective manufacturing and dynamic local demand. It is important to clarify that our sonic toothbrushes are manufactured in China in our own ISO-certified factories, allowing us to offer exceptional value. We operate as the supplier and factory representative for the USA market, specifically serving Los Angeles and California with warehouse and logistics support for efficient bulk supply. Understanding the Los Angeles & California Oral Care Market Los Angeles is a hub of health and wellness trends, with consumers actively seeking advanced, effective personal care products. The demand for electric toothbrushes, particularly sonic models known for their superior plaque removal, is consistently high. This creates a thriving wholesale and B2B scenario for retailers, from boutique health stores to large dental supply chains, who need a steady stream of quality products. Powsmart directly addresses this local market demand by supplying bulk sonic toothbrushes to Los Angeles businesses, ensuring they have access to top-tier…
.jpg)
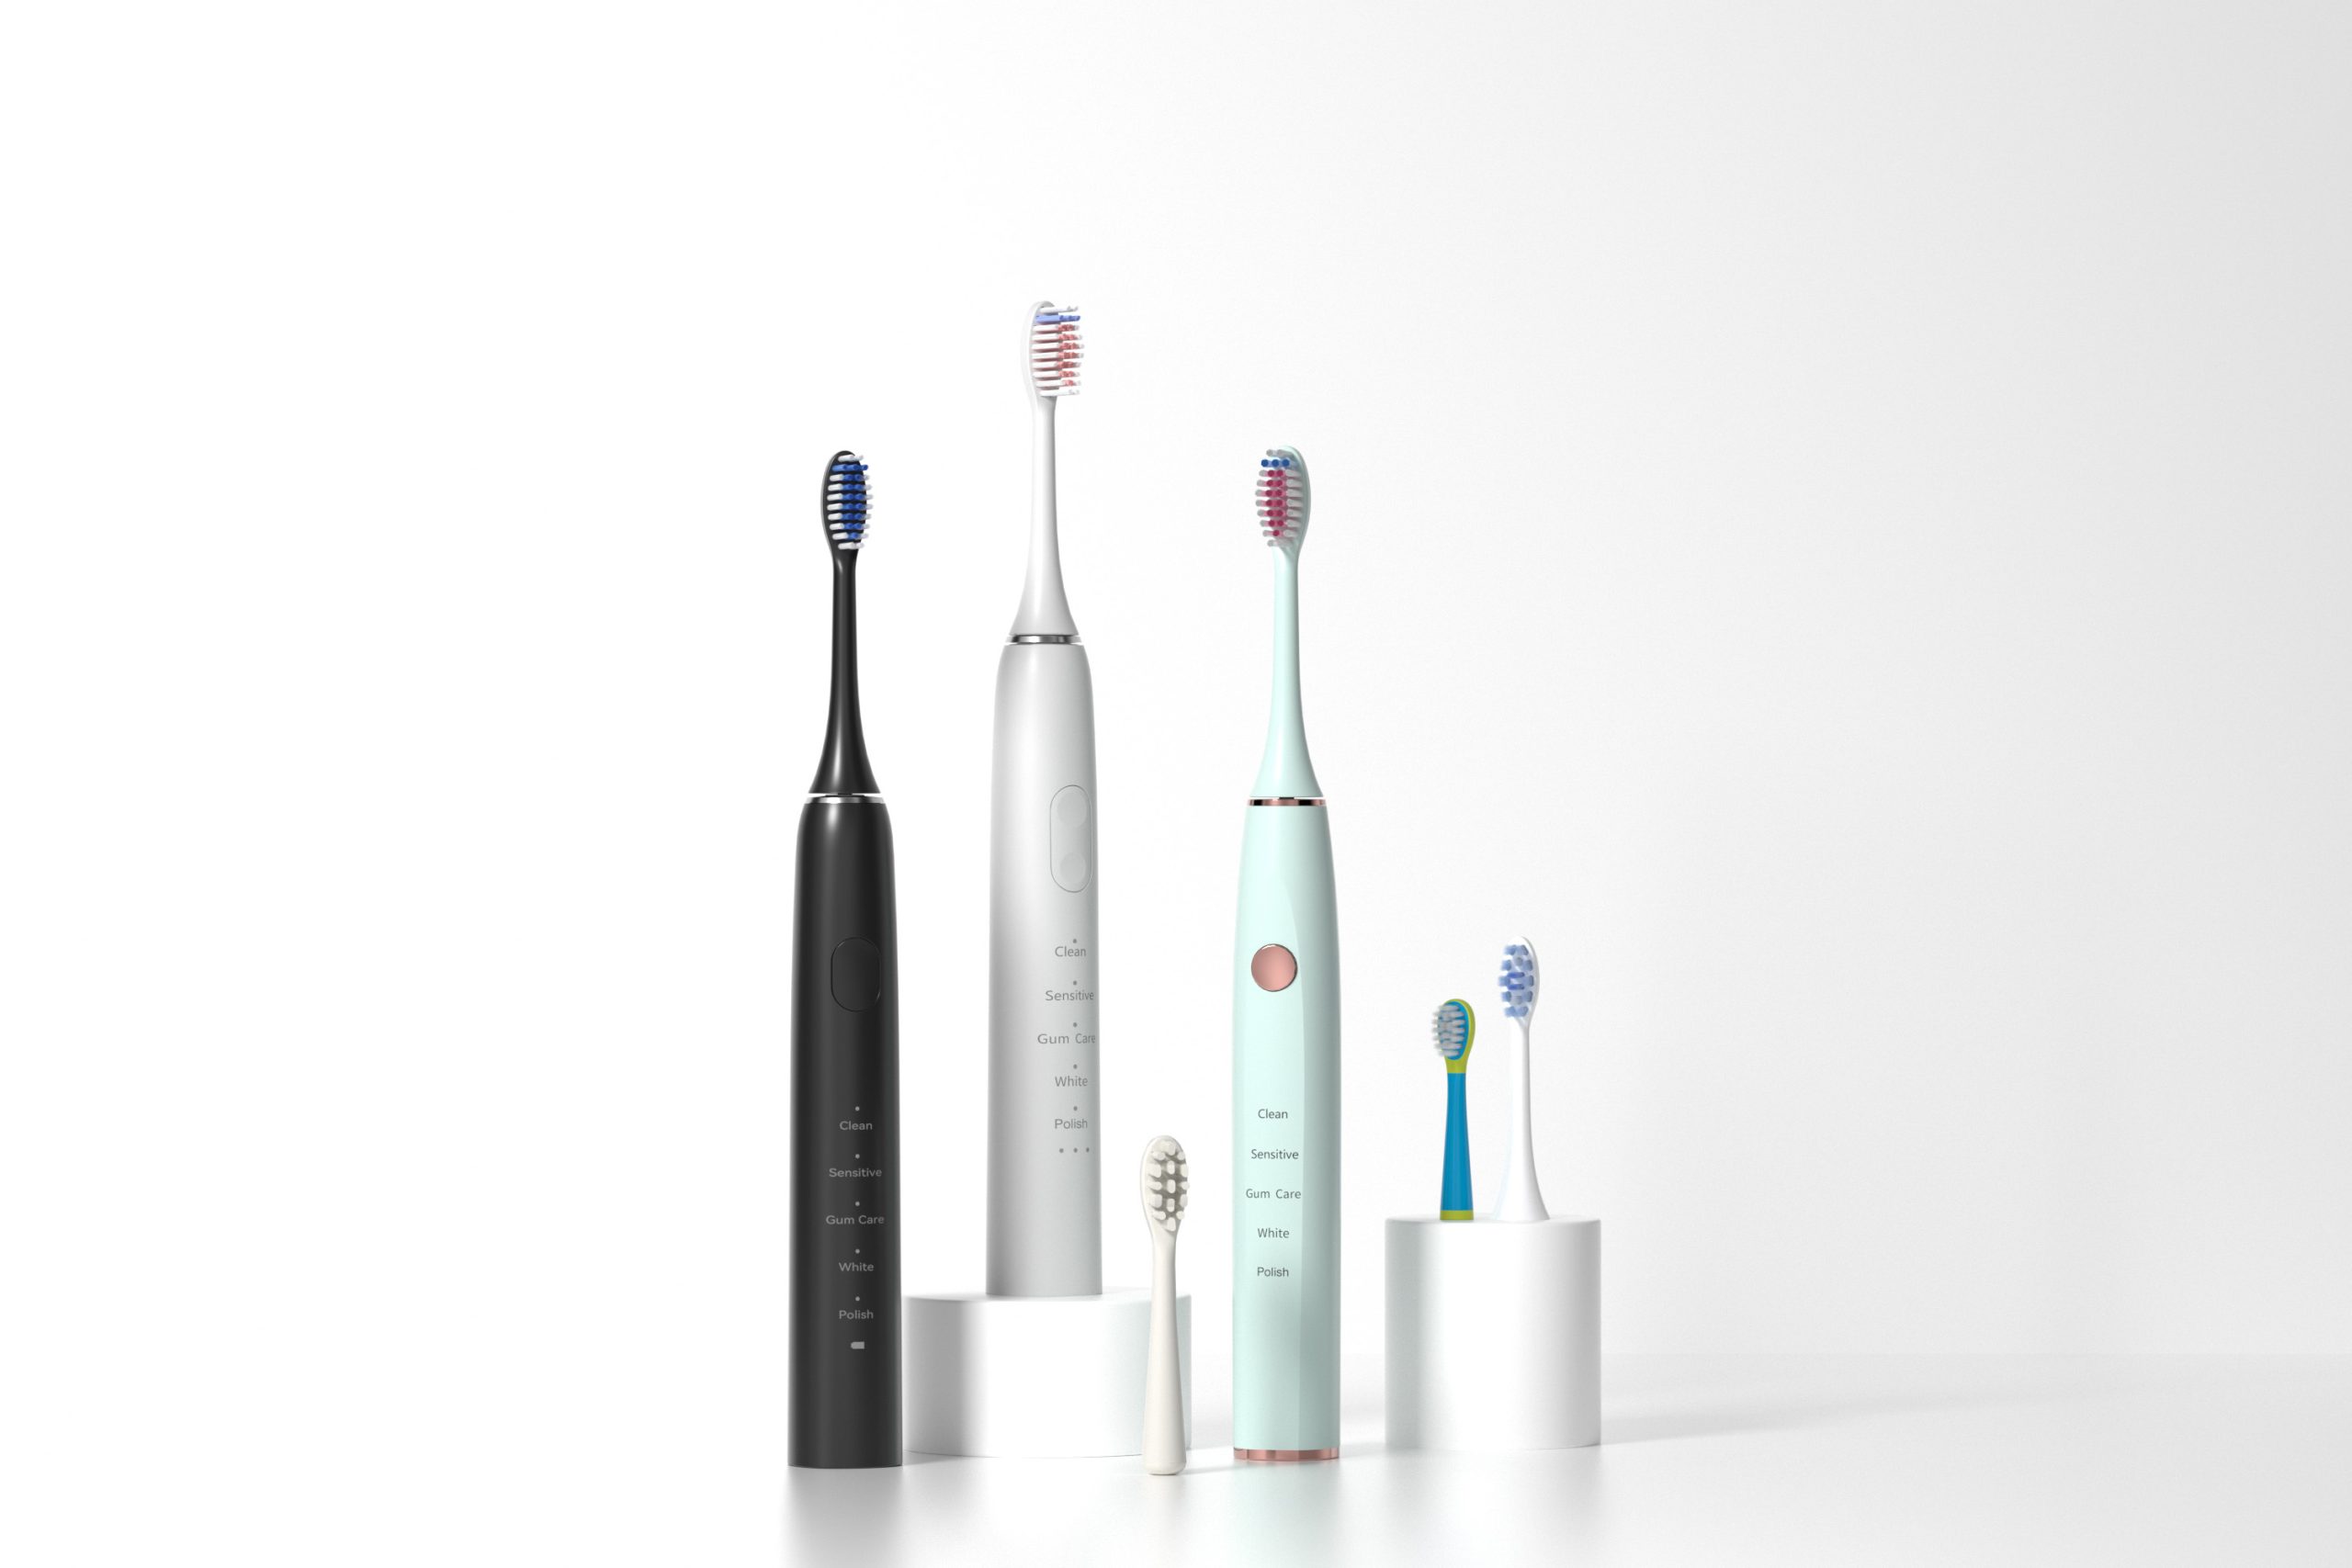
Meeting Los Angeles's Demand for Quality Hotel Supplies & Sonic Toothbrush Distributors The bustling hospitality and retail markets of Los Angeles, California, demand a constant, reliable supply of high-quality products. From upscale hotels in Beverly Hills to boutique lodgings in Downtown LA, the need for durable, guest-pleasing hotel supplies is ever-present. Simultaneously, the health-conscious consumers of cities like Santa Monica and West Hollywood drive demand for advanced personal care items like sonic toothbrushes. Sourcing these products from a trustworthy, cost-effective supplier is key to maintaining a competitive edge. Powsmart: Your Strategic Chinese Manufacturing Partner for the LA Market Powsmart (www.powsmart.com) stands as a premier factory and manufacturer based in China, directly supplying the Los Angeles and broader California market with superior hotel essentials and innovative sonic toothbrushes. We bridge the gap between advanced Chinese manufacturing and the specific needs of American businesses, ensuring partners across LA, from large distributors to hotel chains, receive products that rival top brands in performance but excel in value. Why Los Angeles Wholesalers Choose Powsmart as Their Supplier Unmatched Quality at Competitive Pricing: As a direct factory source, Powsmart eliminates intermediary markups. Our sonic toothbrushes feature high-torque motors, multiple cleaning modes (Clean, White, Sensitive, Gum Care), and…
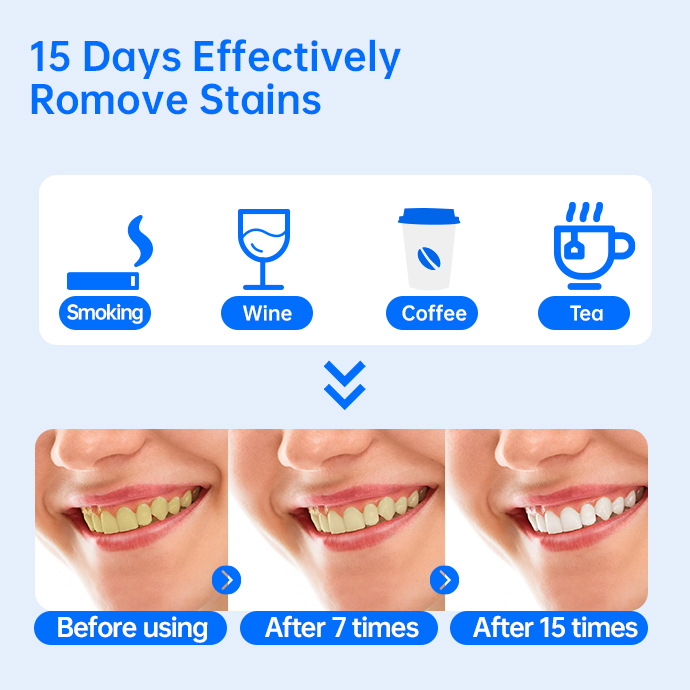
The Los Angeles personal care and oral health market is thriving, driven by health-conscious consumers and a robust network of distributors, retailers, and wellness brands. For businesses seeking a competitive edge in this vibrant landscape, sourcing high-quality, innovative, yet cost-effective sonic toothbrushes is key. Powsmart, a leading Chinese manufacturer and factory specializing in advanced oral care products, stands as your strategic Bowsmart B2B supplier. We bridge the gap between sophisticated manufacturing in China and the dynamic wholesale demands of Los Angeles, California, supplying products that rival top-tier brands in performance while offering unparalleled value. Why Source Sonic Toothbrushes from a Chinese Factory like Powsmart? Choosing a factory-direct supplier from China like Powsmart is a strategic decision for LA-based businesses. It provides significant advantages in pricing, customization, and supply chain control, ensuring you can meet the specific needs of the California market without compromising on quality. Powsmart Sonic Toothbrush: Engineered for Excellence, Designed for Market Success Our sonic toothbrush is engineered with features that cater to the discerning LA consumer and the businesses that serve them. Here are the core advantages: Advanced Sonic Technology: Utilizing high-frequency vibrations (typically 31,000-40,000 strokes per minute), our brushes ensure a deep and gentle clean, effectively removing plaque and promoting gum health—a top priority for wellness-focused…
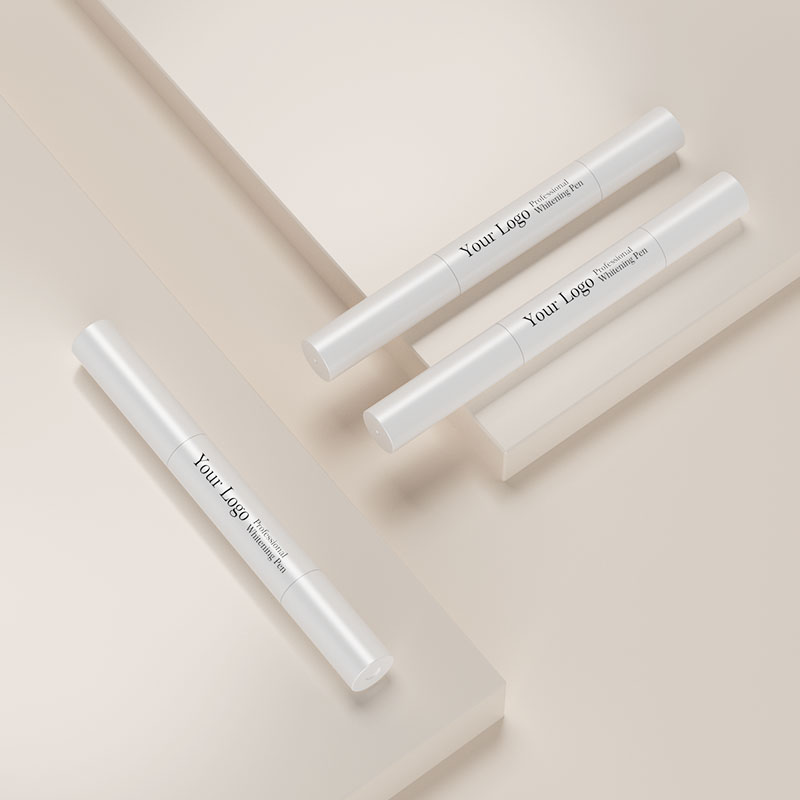
The portable whitening lamp has become a popular choice for both consumers and beauty brands seeking compact and effective whitening solutions. As at-home whitening evolves, portable LED lamps are increasingly included in whitening bundles, travel kits, and professional add-on services. This article explores the benefits, key features, and OEM opportunities associated with portable whitening devices. Why a Portable Whitening Light Device Matters Portability is now a major factor in consumer purchasing decisions. Because users want flexibility, a compact whitening lamp allows them to complete whitening sessions during travel, at work, or at home. Additionally, these lamps deliver LED activation that improves the performance of whitening gels, making them both practical and effective. To explore more whitening technologies, visit powsmart.com. Core Features Buyers Seek in a Portable Whitening Lamp For a lamp to succeed in competitive markets, several features must stand out. High-Efficiency LED Illumination A focused LED beam accelerates stain breakdown when paired with whitening gel. Chip-stabilized output ensures consistent performance throughout each session. Lightweight and Travel-Friendly Design The compact shape and lightweight structure allow users to carry the lamp easily. Many models fit into small cosmetic bags, making them popular among frequent travelers. Versatile Charging Options Some lamps use…
A sensitive teeth whitening tool is designed for users who experience discomfort with regular whitening kits but still want visible whitening results. As sensitivity becomes increasingly common among adults, brands focusing on oral beauty must offer gentle alternatives that maintain effectiveness without irritation. This article outlines why sensitivity-focused devices are trending, what features buyers require, and how manufacturers can capture this growing market. Why Gentle Whitening Tools Are Needed Traditional whitening gels may cause tingling or temporary discomfort, especially for users with weakened enamel or exposed dentin. Therefore, a specialized whitening tool that reduces harsh stimulation is crucial. Because these tools use mild LED wavelengths combined with low-sensitivity formulas, customers can enjoy whitening sessions without unnecessary discomfort. To explore compatible whitening accessories, visit powsmart.com. Essential Features of a Sensitive Teeth Whitening Tool Brands seeking to enter the sensitivity-friendly market should prioritize several key features. Low-Intensity LED Light for Gentle Whitening Compared to high-output systems, gentle LED illumination activates whitening gel without overheating or overstimulation. This balance ensures that whitening remains effective while still protecting sensitive areas. Soft Silicone Mouthpiece for Comfort A flexible mouthpiece provides better fit and comfort, especially for users with gum sensitivity. The soft silicone surface creates…
The wireless teeth whitening kit has quickly become a top choice for consumers who want a convenient, cord-free whitening experience at home. As oral beauty continues to expand across global e-commerce platforms, wireless whitening systems are now considered essential for premium whitening bundles. This article explores how the technology works, what buyers expect, and why brands increasingly choose wireless systems for their whitening lineups. Why a Wireless Whitening System Enhances User Convenience A cordless whitening setup eliminates the discomfort that traditional wired devices often create. Because users can move freely during whitening sessions, the overall experience becomes more enjoyable. Moreover, wireless systems reduce compatibility issues with smartphones, which helps brands reach a broader audience. The combination of LED illumination and whitening gel creates a fast-acting whitening effect. Although the LED light accelerates stain removal, the process stays gentle when the gel concentration is selected correctly. For related whitening devices, visit powsmart.com. Key Features Buyers Expect in a Wireless Teeth Whitening Kit To stay competitive, manufacturers incorporate advanced features that enhance both performance and comfort. LED Light Stability and Whitening Efficiency Stable LED output ensures that the whitening gel activates evenly. This prevents inconsistent results while improving the overall whitening effect.…
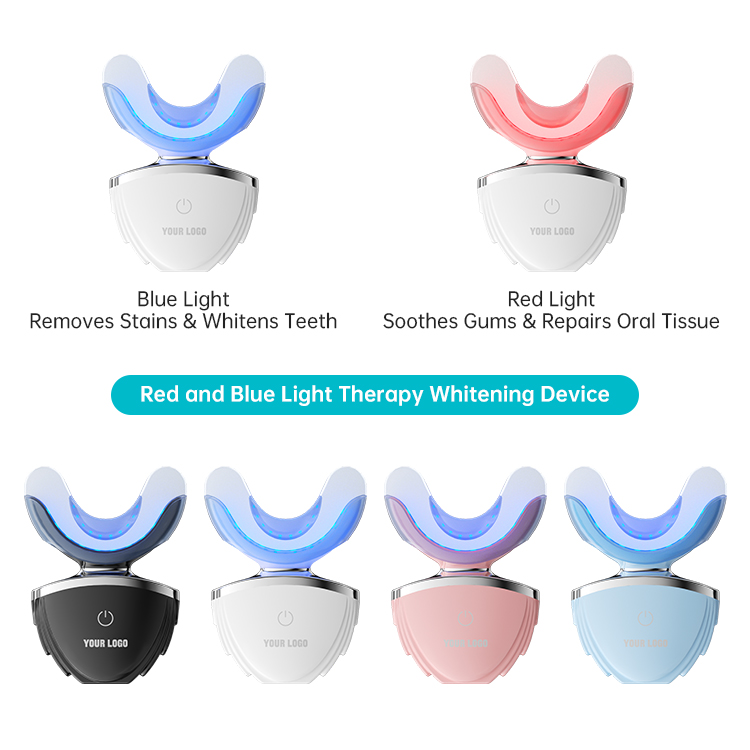
The blue light whitening device continues to shape the future of at-home whitening, especially in markets where consumers want visible results in less time. With strong demand from e-commerce brands, dental distributors, and cosmetic retailers, blue light systems remain a top choice for fast-acting whitening kits. Why Blue Light Enhances Whitening Results Blue wavelengths activate common whitening ingredients more efficiently than ambient light. Consequently, whitening gels break down surface stains faster. This light-boosted process is one of the main reasons consumers prefer blue-light solutions over traditional chemical-only whitening. Additionally, blue light provides consistent exposure across all teeth, which helps maintain even whitening. Silicone trays or mouthpieces support comfort and ensure proper placement during each session. Visit powsmart.com for more whitening technologies. What Buyers Expect in a Modern Whitening Device Because competition continues to grow, manufacturers improve performance and usability through new features: Stable LED Output Consistent brightness is necessary for predictable whitening. Many modern devices include chip-level controllers that maintain stable light emission throughout each session. Safe and Comfortable Design Devices now include automatic shut-off, low heat emission, and medical-grade materials. These features help increase consumer confidence. Convenient Charging Systems Most current blue-light models support USB-C, portable power banks, or…
The LED whitening mouthpiece has become one of the fastest-growing whitening solutions for brands that target at-home oral beauty markets. Because consumers now prefer safe and convenient whitening options, LED mouthpieces have quickly replaced traditional strips and pens in many product lines. This article explains the technology, buyer expectations, and OEM customization opportunities. How an LED Whitening Mouthpiece Works This whitening tool uses light-activated enhancement to improve the performance of whitening gels. When LED wavelengths interact with peroxide-based formulas, they accelerate stain breakdown. Although this technology is powerful, it remains safe for users when applied correctly. LED mouthpieces also provide uniform light coverage, which ensures that both upper and lower teeth receive balanced exposure. Furthermore, silicone trays make the device comfortable to wear during sessions. Explore additional whitening devices at powsmart.com. Key Advantages That Buyers Look For To succeed in competitive markets, whitening mouthpieces must provide distinct advantages. Below are the most important features: Multiple Light Modes for Better Whitening Many premium models incorporate blue, red, or a combination of wavelengths. Blue light helps lift stains, while red light supports gum wellness. Together, they create a more efficient whitening experience. Safe Temperature Control Because safety is essential, mouthpieces are built…
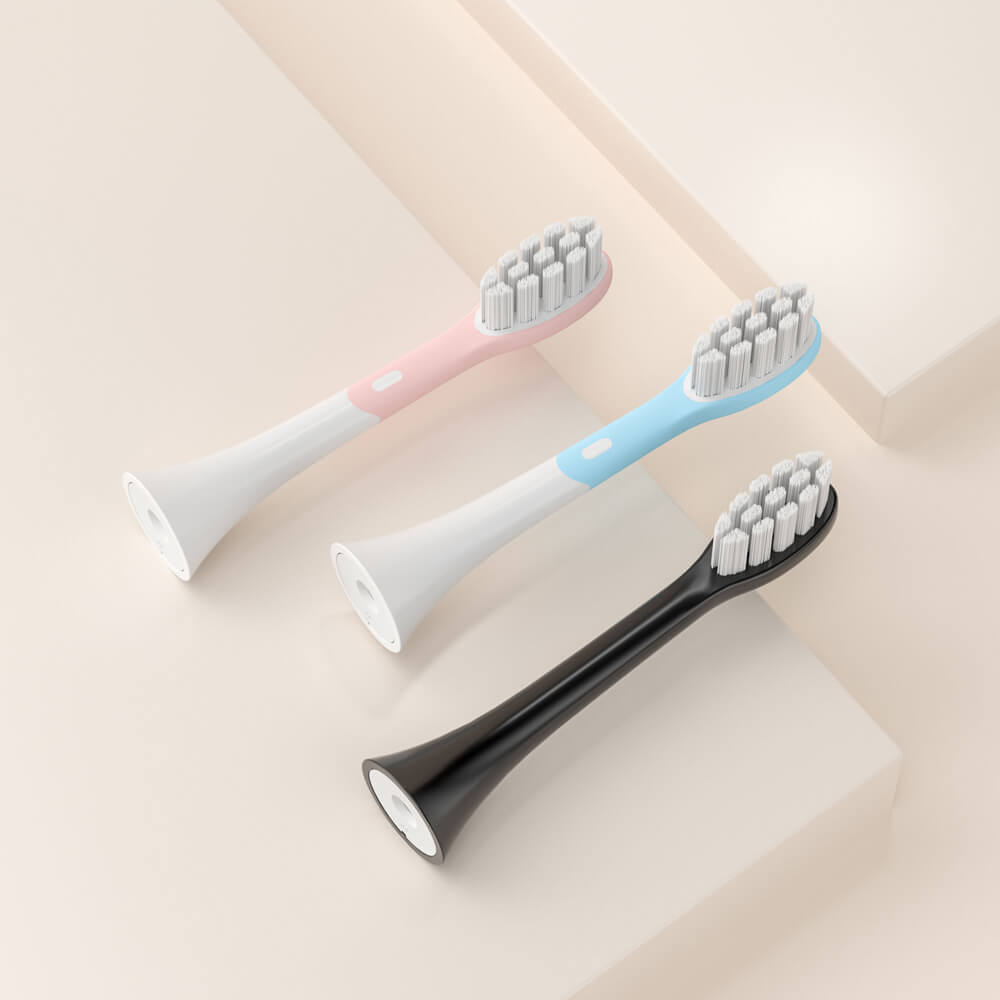
The silicone electric toothbrush has become a preferred choice for users who want a gentler and more hygienic brushing experience. As more consumers shift toward soft silicone material for daily oral care, brands and dental distributors are paying greater attention to product safety, durability, and user comfort. This article explores why silicone-based electric brushes are gaining popularity, especially among OEM and ODM customers who want to differentiate their oral-care lineup. Additionally, it includes internal and outbound links to help readers find more resources. Why a Silicone Brush Head Improves Daily Comfort Silicone bristles provide a gentler touch compared to nylon. Because they are flexible and soft, they reduce irritation on sensitive gums. In addition, silicone naturally resists bacterial buildup, which helps maintain cleanliness throughout the product's lifespan. As a result, many oral-care companies now include silicone-based designs in their premium product categories. When integrated into an electric motor system, these soft bristles create micro-massage effects that improve blood circulation in the gums. Moreover, silicone withstands repeated bending without deforming, making it ideal for long-term use. For more oral-care device options, you may visit our product page at powsmart.com. Key Features Buyers Expect in a Silicone Electric Toothbrush To stand out…
In LED whitening devices, Bio-compatible Housing Materials play a crucial role in improving both device safety and performance. One of the key optical challenges that manufacturers face when designing these devices is Chromatic Aberration—the distortion of light that can occur due to imperfections in lens or housing materials. By selecting the right bio-compatible materials for the housing, manufacturers can reduce this optical distortion and enhance the effectiveness of LED-based whitening treatments. Minimizing Light Distortion for Accurate Whitening Results Chromatic Aberration occurs when different wavelengths of light focus at different points, creating a blurry or colored edge around the light beam. In LED whitening devices, this distortion can lead to uneven application of whitening light, affecting the device's overall efficacy. Bio-compatible Housing Materials with optical clarity can help minimize this aberration, ensuring that light is uniformly focused on the teeth for optimal whitening performance. Ensuring Safe and Effective Light Emission LEDs in whitening devices emit light across a broad spectrum, but their effectiveness relies on the precision of that light being directed to specific areas. Bio-compatible Housing Materials with high optical integrity prevent the scattering or bending of light waves, which can contribute to Chromatic Aberration. This ensures that the light…
.jpg)
When designing a high-pressure Dental Water Jet, one critical feature that cannot be overlooked is the Non-slip Grip Texture. A secure, non-slip grip is essential for ensuring both safety and precision, especially when using a device that delivers powerful water pressure to clean between teeth and along the gumline. By optimizing this feature, manufacturers can offer users a more comfortable, reliable, and effective experience. Ensuring Safety During Use A Dental Water Jet operates under high pressure, which means that any accidental slip during use could lead to uncomfortable mishaps or, worse, injury. The Non-slip Grip Texture ensures that the device remains securely in the user’s hand, even in wet conditions, preventing the risk of dropping the device during operation. Improving User Control and Precision When users need to target specific areas, such as gum pockets or between teeth, precision is key. A non-slip grip helps users maintain steady control of the Dental Water Jet . This is particularly important for high-pressure models where accuracy is essential for effective cleaning. Supporting Ergonomics and Comfort For users with limited hand strength or dexterity, a Non-slip Grip Texture is more than just a safety feature. A textured grip minimizes the effort needed to hold…
The design of a Portable Water Flosser hinges on user experience, and Kinematic Pair Design plays a crucial role in making these devices more ergonomic and intuitive to use. By optimizing the mechanical movement and functionality through careful design, manufacturers can enhance the portability, ease of use, and efficiency of water flossers, making them a go-to choice for consumers on the move. Streamlining Mechanical Movement for Easy Operation Kinematic Pair Design focuses on ensuring that the moving parts of a device work harmoniously. In the case of a Portable Water Flosser, this results in smooth, intuitive movements of the handle, nozzle, and water pressure controls. This integration of parts reduces user frustration and enhances the ease of handling, especially in a portable, compact form. Enhancing Ergonomics for Comfortable Use A well-designed Kinematic Pair ensures that the flosser's nozzle and water delivery system move effortlessly. The optimized alignment of internal gears or linkage systems helps users to grip the flosser better. Ensuring Durability and Compactness In portable devices, maintaining durability without compromising on size is essential. Kinematic Pair Design helps optimize the interaction between the water flosser's internal components to minimize wear and tear. This ensures that moving parts can withstand…
Modern oral-care devices increasingly integrate optical diagnostics, and a secure Brush Head Attachment Mechanism plays a critical role in enabling accurate Subsurface Scattering measurement for enamel health assessment. When the brush head remains stable and aligned, optical sensors can reliably capture light-scattering patterns beneath the enamel surface, improving overall device performance and diagnostic precision. Ensuring Sensor Stability for Reliable Optical Readings A secure Brush Head Attachment Mechanism minimizes vibration and micro-shifts during brushing. This stability is essential for Subsurface Scattering sensors, which rely on consistent positioning to detect light absorption and diffusion inside enamel layers. Maintaining Accurate Light Path Alignment Subsurface Scattering analysis depends on controlled light entry angles. If the brush head is loose or misaligned, the path of emitted light changes, compromising sensor data. A well-engineered attachment system ensures optical alignment throughout brushing motions. Supporting Embedded Sensor Integration Advanced toothbrush designs may embed LEDs, photodiodes, or micro-optical modules directly into the brush head. A secure attachment mechanism not only prevents electrical or structural disruptions but also protects these sensitive optical components during operation. Reducing Noise Interference from Mechanical Movement Unstable brush heads introduce mechanical noise, which can distort Subsurface Scattering readings. Secure attachment reduces unnecessary mechanical resonance, allowing…
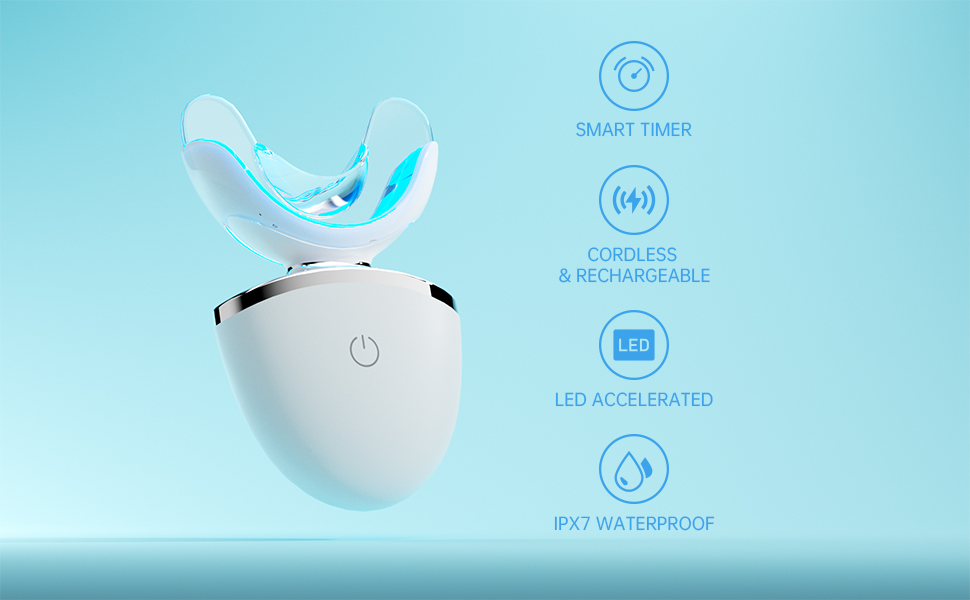
In today’s premium whitening device manufacturing, combining a Smart Timer Chip with Surface Reflectance measurement has become a strategic approach for brands seeking consistent and science-backed whitening performance. By linking timing intelligence with real-time optical data, OEM/ODM whitening kits can deliver more accurate treatment cycles and improved user confidence. Achieving Data-Driven Whitening Precision Surface Reflectance measurement allows the device to detect subtle brightness changes on enamel. When paired with a Smart Timer Chip, these optical readings help regulate treatment duration, ensuring each whitening cycle is matched to actual tooth response rather than fixed intervals. Preventing Over-Treatment and Sensitivity Without controlled timing, whitening gels may remain active longer than recommended. The Smart Timer Chip prevents this by enforcing safe exposure periods, while Surface Reflectance data helps reduce unnecessary light or gel application—lowering the risk of enamel sensitivity. Enhancing Consistency Across Users Every user’s enamel density, hydration level, and staining pattern differ. Real-time reflectance feedback combined with precise timing enables the whitening kit to adapt to these variations, delivering more uniform results across diverse user profiles. Supporting Intelligent LED Output Management Surface Reflectance data can signal when teeth have reached an optimal whitening threshold. The Smart Timer Chip can then adjust LED…
.jpg)
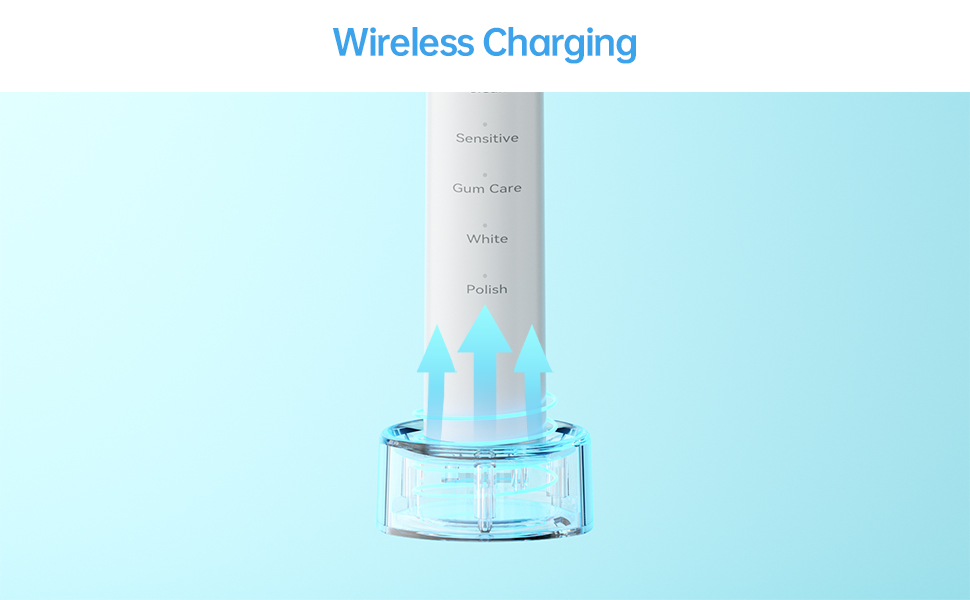
In modern oral-care device engineering, brands increasingly ask how a Wireless Charging Base can be seamlessly integrated with optimized Flow Channel Geometry inside next-generation water flossers. This question reflects a broader industry push toward compact structure layouts, improved hydraulic performance, and stable power delivery—especially as OEM/ODM buyers demand both efficiency and reliability in a single design. Ensuring Internal Layout Compatibility Integrating Flow Channel Geometry requires careful internal mapping so the Wireless Charging Base does not interfere with pump positioning or water pathways. Manufacturers must design a chassis that maintains stable electromagnetic alignment while leaving unobstructed space for high-efficiency channels. Minimizing Electromagnetic Interference Wireless power transfer coils can create electromagnetic fields that may disrupt sensing modules or micro-pumps. Proper shielding and placement ensure that the optimized Flow Channel Geometry delivers smooth, turbulence-controlled water flow without distortion caused by electrical interference. Enhancing Energy Efficiency for High-Flow Performance A well-designed Wireless Charging Base provides a predictable input current, enabling the motor and pump to generate stronger. Paired with streamlined Flow Channel Geometry, energy-to-pressure conversion becomes more efficient, supporting stable pulsation modes. Supporting Ergonomic and Compact Device Form Factors B2B partners often want slimmer flossers. Integrating wireless charging eliminates bulky ports, allowing engineers to…
As oral-care devices increasingly operate in bathrooms, showers, and other moisture-rich settings, manufacturers are prioritizing Waterproof IPX7 Design to safeguard delicate internal components such as the Hydro-dynamic Bearing. Ensuring long-term stability in humid environments requires an engineering approach that tightly integrates sealing, fluid management, and structural durability. Moisture Isolation Prevents Bearing Degradation Hydro-dynamic Bearings rely on precise lubrication films and friction control. With IPX7-level sealing, moisture cannot penetrate the internal chamber, preventing corrosion or disruption of the bearing’s fluid film. Precision Sealing Structures Maintain Internal Pressure Balance A Waterproof IPX7 Design incorporates O-ring grooves, elastomer seals, and ultrasonic-weld seams that stabilize pressure and prevent microleakage. This protection is essential to keep the Hydro-dynamic Bearing operating within its required tolerance range. Internal Vent Pathways Reduce Condensation Accumulation In high-humidity environments, condensation can form inside device housings. Custom vent pathways and vapor-control channels help divert moisture away from the Hydro-dynamic Bearing, preserving its rotational accuracy and lifespan. Material Selection Enhances Corrosion Resistance Selecting polymers and metals compatible with IPX7 sealing improves long-term corrosion protection. Stainless-steel bearing sleeves, PTFE coatings, and anti-oxidative plastics ensure stable performance under repeated water exposure. Overmolding Techniques Improve Structural Integrity IPX7 protection is strengthened through precision overmolding of…
.jpg)
For retailers, distributors, and dental care businesses in Chicago and across Illinois, sourcing reliable, high-performance, and competitively priced sonic toothbrushes is key to staying ahead. While the demand for advanced oral hygiene products surges in the Windy City's vibrant market, many top-tier products originate from global manufacturing hubs. Powsmart stands out as a premier factory and manufacturer based in China, directly supplying the Chicago wholesale market with professional-grade sonic toothbrushes that rival leading brands in quality but excel in value. Chicago & Illinois Market Demand: Why Sonic Toothbrushes? The health-conscious consumers of Chicago, from the Loop to the North Shore, actively seek superior dental care solutions. Sonic toothbrushes, known for their deep cleaning and gum-care benefits, have moved from luxury to necessity. Local retailers, dental clinics, hotel suppliers, and corporate wellness programs require a steady, affordable supply of these devices. This creates a thriving wholesale market scene in Illinois, where partnerships with dependable international manufacturers are crucial for inventory that meets both quality expectations and profit margins. Powsmart: Your Direct Chinese Factory & Supplier for the Chicago Region It is important to clarify that Powsmart operates as a design-led factory and direct manufacturer headquartered in China. We are not a local Chicago producer, but we serve…

.jpg)
.jpg)
.jpg)
.jpg)
.jpg)

.jpg)
.jpg)